Figure 4.2: Original image
Figure 4.1: Rays extending from bright areas
LightLeak, LightStreak, or StarGlow, which stretches when a strong light is reflected, let's express this with a post effect. Here, for convenience, it is called StarGlow.
This post-effect presented here was presented by Masaki Kawase at GDC 2003.
The sample in this chapter is "Star Glow" from
https://github.com/IndieVisualLab/UnityGraphicsProgramming4
.
Figure 4.2: Original image

Figure 4.3: Image of detecting only high-brightness pixels
First, let's create an image (brightness image) that detects only bright areas. The same process is required for general glow. The source code of the shader and script for creating a luminance image is as follows. Note that the shader path is 1.
StarGlow.cs
RenderTexture brightnessTex
= RenderTexture.GetTemporary(source.width  / this.divide,
                             source.height / this.divide,
                             source.depth,
                             source.format);
…
base.material.SetVector
(this.idParameter, new Vector3(threshold, intensity, attenuation));

Graphics.Blit(source, brightnessTex, base.material, 1);
StarGlow.shader
#define BRIGHTNESS_THRESHOLD _Parameter.x
#define INTENSITY            _Parameter.y
#define ATTENUATION          _Parameter.z
…
fixed4 frag(v2f_img input) : SV_Target
{
    float4 color = tex2D(_MainTex, input.uv);
    return max(color - BRIGHTNESS_THRESHOLD, 0) * INTENSITY;
}
There are various methods for calculating the brightness, but the calculation method used in the classical glow implementation was used as it is. I also see shaders that perform processing such as grayscale once and then comparing the brightness.
BRIGHTNESS_THRESHOLDIs the threshold for determining brightness, and INTENSITYis the bias to multiply brightness. colorMake sure that the larger the value given to, that is, the brighter the color, the easier it is to return a large value. The higher the threshold, the less likely it is that a value greater than 0 will be returned. Also, the larger the bias, the stronger the brightness image can be obtained.
ATTENUATIONIs not used at this point. Since the overhead required for exchanging values between CPU and GPU is smaller if they are passed as parameters at once, Vector3they are passed together here .
The most important thing at this point is that we are getting the luminance image as a small RenderTexture.
In general, the higher the resolution of a post effect, the greater the load on the Fragment shader, which increases the number of calls and calculations. Furthermore, with regard to the glow effect, the processing load becomes even greater due to repeated processing. Star Glow is no exception to this example. Therefore, the load is reduced by reducing the resolution of the effect to the required level.
The iterative process will be described later.

Figure 4.4: Diagonally stretched luminance image
Blur the brightness image obtained in STEP1 and stretch it. By devising this stretching method, it expresses a sharply extending ray that is different from general glow.
In the case of general glow, it is stretched by the Gaussian function in all directions, but in the case of star glow, it is stretched in a directional manner.
StarGlow.cs
Vector2 offset = new Vector2(-1, -1);
// (Quaternion.AngleAxis (angle * x + this.angleOfStreak,
//                       Vector3.forward) * Vector2.down).normalized;

base.material.SetVector(this.idOffset, offset);
base.material.SetInt   (this.idIteration, 1);

Graphics.Blit(brightnessTex, blurredTex1, base.material, 2);

for (int i = 2; i <= this.iteration; i++)
{
    Repeated drawing
}
It is different from the actual processing, but offset = (1, 1)let's just explain it here . Also note that we are passing offsetand iterationto the shader.
Next, on the script side, drawing is repeated with shader path 2, but for the sake of simplicity, let's move on to the shader once. Notice that we are drawing in shader path 2.
StarGlow.shader
int    _Iteration;
float2 _Offset;

struct v2f_starglow
{
    …
    half   power  : TEXCOORD1;
    half2  offset : TEXCOORD2;
};

v2f_starglow vert(appdata_img v)
{
    v2f_starglow or;
    …
    o.power  = pow(4, _Iteration - 1);
    o.offset = _MainTex_TexelSize.xy * _Offset * o.power;
    return o;
}

float4 frag(v2f_starglow input) : SV_Target
{
    half4 color = half4(0, 0, 0, 0);
    half2 uv    = input.uv;

    for (int j = 0; j < 4; j++)
    {
        color += saturate(tex2D(_MainTex, uv)
               * pow(ATTENUATION, input.power * j));
        uv += input.offset;
    }

    return color;
}
First, check from the Vertex shader. Indicates powerthe force with which the brightness attenuates when stretched, offsetand indicates the direction in which the brightness is stretched by the blur. It will be referenced in the Fragment shader described later.
These are calculated within the Vertex shader to refer to common values within the Fragment shader. It is not good to calculate sequentially in the Fragment shader because it increases the number of operations.
Here it _Iteration = 1is. Therefore power = 4^0 = 1. Then offset = 画素の大きさ * (1, 1)you will get.
Now you are ready to sample pixels that are offset by exactly one pixel.
Next is the Fragment shader. To see uvwo offsetone by only one minute to move the reference 4 times while, we are adding up the value of the pixel. However, the pixel value is pow(ATTENUATION, input.power * j)multiplied by.
ATTENUATIONIs a value that indicates how much the value of that pixel is attenuated. It affects the degree of blurring and attenuation when stretched.
If ATTENUATION = 0.7so, the first pixel to be sampled would be * 0.7, and the second pixel to be sampled would be 0.7 ^ 2 = * 0.49. It is easy to get an image when you look at the figure.
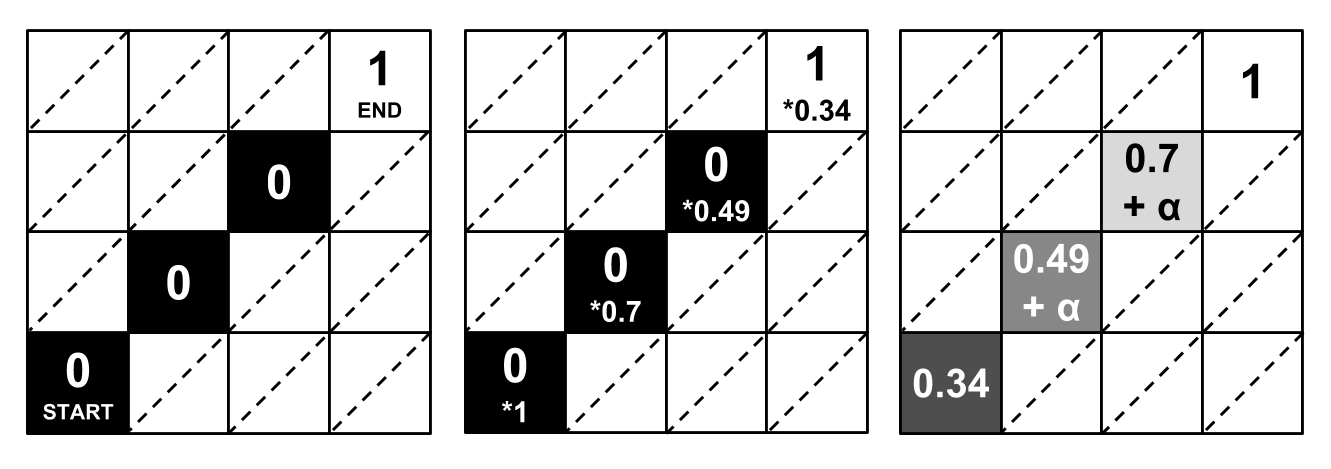
Figure 4.5: A diagram showing the process of blurring
The figure on the left is the original brightness image before attenuation. _MainTexCorresponds to. uvLet's say the pixel now given to the Fragment shader but referenced is START at the bottom left. offset = (1, 1)Therefore, the pixels referenced in the four iterations are up to END in the upper right.
The value in a pixel is the brightness value of that pixel. Three from START are 0s and only END is 1. The attenuation factor of the above source code increases with each iteration, so the image looks exactly like the one in the middle. When this is added up, the final value obtained for the START pixel is color = 0.34.
If the Fragment shader processes each pixel in the same way, you will see the result shown on the right. You get a gradation like a blur. Also offsetit is described in a certain and earlier in the parameter that indicates the direction to stretch. However, as the effect on the appearance, it will extend in the opposite direction to the specified value.

Figure 4.6: Further stretched luminance image
Let's get back to the script a little bit. There is this.iterationno explanation so far, _Iterationbut it was said to be 1. Actually, the same process is repeated any number of times while replacing the RenderTexture.
StarGlow.cs
Vector2 offset = new Vector2(-1, -1);

base.material.SetVector(this.idOffset, offset);
base.material.SetInt   (this.idIteration, 1);

Graphics.Blit(brightnessTex, blurredTex1, base.material, 2);

== The explanation from here to above corresponds to the explanation ==

for (int i = 2; i <= this.iteration; i++)
{
    base.material.SetInt(this.idIteration, i);

    Graphics.Blit(blurredTex1, blurredTex2, base.material, 2);

    RenderTexture temp = blurredTex1;
    blurredTex1 = blurredTex2;
    blurredTex2 = temp;
}
Since the same process is repeated using the same path, the effect obtained does not change. However, _Iterationthe value of the shader parameter will be higher, which will increase the attenuation in the shader described earlier. Also, the input image will be a blurred image that has already been stretched.
Simply put, this iteration blurredTex1results in a blurry image that is even more stretched than the first .
This process is costly, so in reality I think it will be repeated at most 3 times. Also, there are four iterations in the shader, but this value was suggested in Kawase's announcement.

Figure 4.7: Luminance image stretched in another direction
I didn't comment on STEP2.5 in the source code, but I chose 2.5 for the sake of explanation. As mentioned earlier, let's rotate and blur again offset = (1, 1)to create a ray that extends in multiple directions offset.
Suppose offset = (1, 1)we define a ray that extends in the opposite direction offset = (-1, -1). In the actual source code, only the number of rays offsetis rotated, but for the sake of explanation offset = (-1, -1).
StarGlow.cs
for (int x = 1; x <= this.numOfStreak; x++)
{
    Vector2 offset = Quaternion.AngleAxis(angle * x + this.angleOfStreak,
                                          Vector3.forward) * Vector2.down;
    offset = offset.normalized;

    for (int i = 2; i <= this.iteration; i++) {
        bluuredTex1 is stretched by iterative processing
    }

    Graphics.Blit(blurredTex1, compositeTex, base.material, 3);
}
The finally obtained blur image blurredTex1is compositeTexoutput to the image for compositing . compositeTexIs a composite image of all blur images that extend in multiple directions.
At this time, the shader path used to combine the blur images is 3.
StarGlow.shader
Blend OneMinusDstColor One
…
fixed4 frag(v2f_img input) : SV_Target
{
    return tex2D(_MainTex, input.uv);
}
No special processing is done in this path, but the Blendsyntax is used to synthesize the images. I think that the composition method may be remade depending on the production, but I decided here OneMinusDstColor One. This is a soft composition method.

Figure 4.8: Final Blur image
After obtaining a blur image that extends in multiple directions, the blur image is combined with the original image and output in the same way as a general glow. You Blendcan use the same syntax as in STEP 2.5 above to synthesize and output, but here, Blitto reduce the number of times and to make the synthesis method flexible, Pass 4we use the one for synthesis. ..
StarGlow.cs
base.material.EnableKeyword(StarGlow.CompositeTypes[this.compositeType]);
base.material.SetColor(this.idCompositeColor, this.color);
base.material.SetTexture(this.idCompositeTex, compositeTex);

Graphics.Blit(source, destination, base.material, 4);
StarGlow.shader
#pragma multi_compile _COMPOSITE_TYPE_ADDITIVE _COMPOSITE_TYPE_SCREEN …
…
fixed4 frag(v2f_img input) : SV_Target
{
    float4 mainColor      = tex2D(_MainTex,      input.uv);
    float4 compositeColor = tex2D(_CompositeTex, input.uv);

    #if defined(_COMPOSITE_TYPE_COLORED_ADDITIVE)…
     || defined(_COMPOSITE_TYPE_COLORED_SCREEN)

    compositeColor.rgb
        = (compositeColor.r + compositeColor.g + compositeColor.b)
        * 0.3333 * _CompositeColor;

    #endif

    #if defined(_COMPOSITE_TYPE_SCREEN)…
     || defined(_COMPOSITE_TYPE_COLORED_SCREEN)

    return saturate(mainColor + compositeColor
                  - saturate(mainColor * compositeColor));

    #elif defined(_COMPOSITE_TYPE_ADDITIVE)…
       || defined(_COMPOSITE_TYPE_COLORED_ADDITIVE)

    return saturate(mainColor + compositeColor);

    #else

    return compositeColor;

    #endif
}
BlendAlthough the syntax is not used, the screen composition and additive composition are reproduced as they are. Furthermore, here, by adding a color that is arbitrarily multiplied, it is possible to express a star glow with a strong color.
Release all the resources you have used. There is no special explanation, but just in case it is described in the sample on the source code. If the implementation environment is limited, it may be possible to reuse the reserved resources, but here we will simply release it.
StarGlow.cs
base.material.DisableKeyword(StarGlow.CompositeTypes[this.compositeType]);

RenderTexture.ReleaseTemporary(brightnessTex);
RenderTexture.ReleaseTemporary(blurredTex1);
RenderTexture.ReleaseTemporary(blurredTex2);
RenderTexture.ReleaseTemporary(compositeTex);
I explained the basic (as announced by Mr. Kawase) implementation method of Star Glow, but if you are not particular about real-time performance, you can express various rays by switching the calculation method and parameters of the brightness image multiple times. And so on.
Even within the range described here, if you change the parameters at the timing of the iteration, for example, you will be able to create heterogeneous, more "like" and "tasteful" rays. Or you can use noise to change the parameters over time.
It is not a physically correct ray, and if you need a more dramatic and advanced expression of rays, it will be realized by a method other than the post effect, but this effect that can be made gorgeous with a relatively simple structure is also available. It's very interesting so please give it a try.
… It's a little heavy.